

Foundation article of the series Vaadin – Deployment on Hetzner. It produces the server on which the following parts put a Vaadin application into operation. All commands and outputs come from an actual run on a Debian 13 server.
Goal of This Foundation Article
This series describes how a Vaadin application goes into operation on a server of your own — without Docker, without Kubernetes, without a CI/CD pipeline. Six parts show the same application in five different deployment forms, from the classic WAR on an installed Jetty to the self-sufficient distribution that brings its own Java runtime.
This part comes before all the others. It does not describe a single step that has anything to do with Vaadin. It produces the server on which everything else takes place.
Why This Deserves an Article of Its Own
A freshly provisioned server is not a secure server. It accepts password logins
for root, has no firewall, knows only a single user, and nowhere separates
program, configuration, and data. All of this can be fixed in just under an
hour — and all of it is regularly skipped, because it is not the task you
actually set out to do.
The urgency can be quantified. On the server on which this series was written, the first foreign login attempt appeared in the log twenty-three seconds after boot. At that point no service was published, no domain pointed to the address, and nobody but the operator knew it. Chapter 7 shows the numbers in detail.
Hardening is therefore not a precaution for the case that somebody comes by. Somebody will come by. The only open question is what they will find.
What This Part Produces
At the end stands a Debian server that is kept up to date, on which nobody can
log in as root or with a password anymore, whose firewall lets only three
inbound ports through, and whose directories separate program, configuration,
and mutable data from one another. Chapter 11 lists the achieved state as a
verifiable checklist.
The last point looks like tidiness and is not. The separation is the precondition for effectively confining the application service in Part 1 — Chapter 10 comes back to this.
Who Can Skip This Part
Anyone who already runs a server the way just described can continue directly with Part 1. Chapter 11 summarizes the achieved state in a list that can be used as a cross-check.
Everyone else should start here. Part 1 assumes this state and only refers back to it.
A Word on Version Numbers
The versions mentioned are the state at the time this series was written. They age — Debian, the JDK, Jetty, and Caddy appear in new releases while this text is still being read. This changes nothing about the described procedure; the commands stay the same, only the numbers in them shift. Anyone following along checks the current releases and adjusts accordingly.
The Demo Application for This Series
This part does not touch the repository — it produces the server and nothing else. The application that the following parts deploy is open, and every part has its own code state:
git clone https://github.com/svenruppert/Blog-Vaadin-Deployment-on-Hetzner
cd Blog-Vaadin-Deployment-on-Hetzner
The README maps the tags to the parts. The first checkout becomes relevant in Part 1.
Prerequisites
This article assumes a server that already exists and is reachable. Specifically:
A Server Exists
A virtual or physical server with root access. How it came into being — via the Hetzner console, at another provider, as a virtual machine in the basement — does not matter for anything that follows.
The series title mentions Hetzner because the series was written there. In terms of content, nothing from here on is provider-specific. No cloud consoles, no provider APIs, and no vendor-specific firewalls appear. Everything runs in the operating system, and that applies equally at every provider.
Debian 13
The operating system is Debian 13 (“trixie”). The series was developed and verified on it.
On Ubuntu LTS the procedure works largely identically — package names and
paths match, systemd behaves the same. Two spots differ: Ubuntu already
ships ufw, and the defaults of the SSH configuration are different. Where
this becomes relevant, a note points it out.
SSH Login Works
Logging in as root via SSH already works — whether by key or by password
does not matter at this point. Chapter 3 starts at the first connection.
Public IP Address
The server has a publicly reachable IPv4 address. It will be needed in Part 1, when a DNS name is to point to it and a TLS certificate is to be issued.
An IPv6 address is useful but not required. Anyone who uses it must handle it consistently: firewall, reverse proxy, and DNS record must match. A published AAAA record in front of a firewall configured only for IPv4 produces partial outages that are hard to diagnose because they affect only some of the visitors.
What This Article Does Not Cover
To be clear about the boundaries:
- How the server comes into being. Ordering process, console interfaces, and plan selection do not appear.
- Backups. A server without backups is incompletely operated, but the topic has requirements of its own and does not belong in an article about basic setup.
- Monitoring and alerting. Just as important, just as much a topic of its own.
- Multiple applications on one server. The procedure transfers to that, but is shown here with exactly one application.
- High availability. This is about one server, not two. Where that has noticeable consequences — with restarts, for example — it is stated explicitly.
Prerequisites on the Workstation
On your own machine you need: an SSH client, an SSH key pair, and dig or a
comparable tool for DNS queries. All three are present on Linux and macOS; on
Windows, the OpenSSH client provides the first two.
Anyone who does not have a key pair yet creates one once:
ssh-keygen -t ed25519 -C "description"The key type ed25519 is the right choice today: short keys, fast
verification, no parameter decisions. RSA still works, but brings no
advantage.
First Login
Verifying the Host Key Fingerprint Before Connecting
On the first ssh to an unknown server, this question appears:
The authenticity of host '198.51.100.10' can't be established.
ED25519 key fingerprint is SHA256:1IuzQgLqT1igW12PXwm21tZVst6deL77O4URLtCVvcQ.
Are you sure you want to continue connecting (yes/no/[fingerprint])?
Anyone who types “yes” here answers a question they have not verified. The
fingerprint is stored in ~/.ssh/known_hosts and treated as trustworthy from
then on — even if it comes from an attacker who has inserted himself between
the two sides.
That is exactly what the question is for. It can be answered if you know the fingerprint beforehand. And it can be obtained without logging in:
ssh-keyscan 198.51.100.10 > /tmp/hostkeys.txt
ssh-keygen -lf /tmp/hostkeys.txt256 SHA256:1IuzQgLqT1igW12PXwm21tZVst6deL77O4URLtCVvcQ 198.51.100.10 (ED25519)
3072 SHA256:qRRKI3aDfWddsRbY6BcvWtpns06AbUI62GycM3PLp+c 198.51.100.10 (RSA)
256 SHA256:FzRV3J01kuU9sxKy76duO4C+kBiiQmC4PdSyWZCpyB4 198.51.100.10 (ECDSA)The objection is obvious: whoever can intercept the connection can also forge
the answer to ssh-keyscan. That is true. The comparison is therefore only
worth something if the fingerprint comes from a second, independent source
— from the provider’s console, from a serial connection, or from the
provisioning log. The two-source comparison is the actual step; ssh-keyscan
only supplies one side of it.
Three keys are the factory state. Chapter 6 reduces them to one — then there is exactly one fingerprint to verify instead of three, of which it is unclear which one currently applies.
Offered Authentication Methods
Even before the first login, you can determine how the server accepts logins in the first place:
ssh -o PreferredAuthentications=none root@198.51.100.10root@198.51.100.10: Permission denied (publickey,password).The parenthesis is the answer: the server accepts keys and passwords.
That is the usual factory state — and the state that Chapter 6 eliminates.
After the hardening, only publickey remains there, and that is exactly how
success can be read off.
Surveying the Initial State
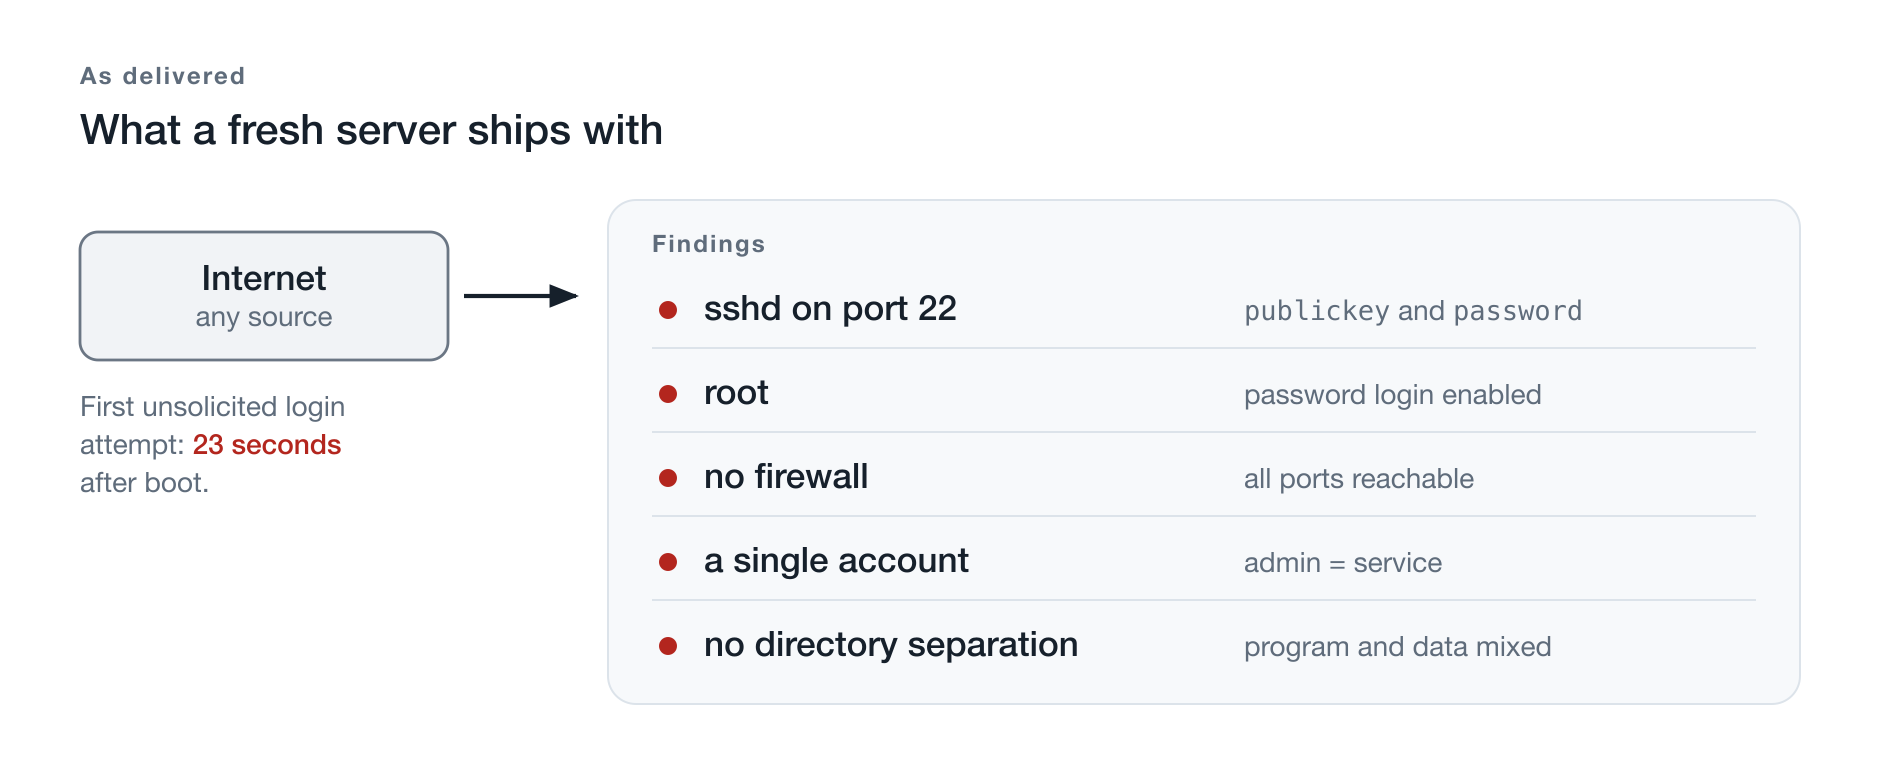
Figure 1: Captured on the reference server before the first change was made.
Before the first change, an inventory is worthwhile. It costs a minute and later answers the question of what the system came with and what has been added.
# What is reachable from outside?
ss -tlnp

# Are there users besides root?
awk -F: '$3>=1000 && $7!~/nologin|false/ {print $1}' /etc/passwd

# Does a firewall exist?
command -v ufw || echo "ufw not installed"
nft list ruleset

# How many updates are pending?
apt-get update && apt-get -s upgrade | grep -c '^Inst'
On the server on which this series was written, it looked like this:
- exclusively
sshdon0.0.0.0:22and[::]:22 - no user with a UID of 1000 or above — only
root - no firewall, no
nftablesruleset - four pending package updates
That is a typical factory state: exactly one service is running, and it accepts password logins for the most powerful user of the system.
If the Server Comes With a Root Password
Some providers deliver a server without a deposited SSH key and send a root password instead. On the first login, the system then immediately forces a change:
You are required to change your password immediately (administrator enforced).
WARNING: Your password has expired.
You must change your password now and log in again!
New password:
Retype new password:
passwd: password updated successfully
Connection to 198.51.100.10 closed.
Two properties of this dialog regularly come as a surprise. First, the connection is closed after the change — that is not an error; you log in again with the new password. In scripts, however, it looks like an abort. Second, the new password is asked for only once and displayed nowhere. Anyone who has not thought beforehand about where it belongs has a problem.
This route also opens a time window in which root is reachable from the
Internet by password. How short this window should be is shown by the
numbers in Chapter 7. Where there is a choice, an SSH key deposited at
creation time is the better option — then this section disappears entirely.
Result. The fingerprint is verified, the initial state is noted, the connection stands. From here on, things change — starting with the system’s package state.
Updating the System
apt update and apt upgrade
The delivery state of an image is rarely the current package state. Weeks lie between the creation of the image and the provisioning of the server.
apt-get update
apt-get upgrade
On the reference server it was four packages — the python3.13 stack. Not
much, but among them was a security update.
Kernel Update and Reboot
Here lurks the first pitfall, and it is treacherous because nothing points to it.
apt upgrade installs a new kernel but does not activate it. The server
keeps running on the old one — including the vulnerabilities the update was
supposed to close. In apt, everything looks clean.
It can be checked with two commands:
uname -r                                   # running kernel
ls -1 /boot/vmlinuz-* | sort -V | tail -1  # installed kernel
On the reference server:
| running | 6.12.88+deb13-cloud-amd64 |
| installed | 6.12.107+deb13-cloud-amd64 |
Debian additionally reports the need via a file:
[ -f /var/run/reboot-required ] && echo "reboot required"systemctl rebootAfter booting:
uname -r     # 6.12.107+deb13-cloud-amd64
uptime -p    # up 0 minutes
Automatic Security Updates
A server that is updated only when it is set up is open to attack after a few
months. Debian ships unattended-upgrades, and on most images it is already
active:
systemctl is-enabled unattended-upgradesWith this, security updates are applied automatically. What does not happen automatically is what was the problem above: the reboot.
This is exactly where the circle closes. Automatic updates without an automatic reboot mean that kernel vulnerabilities are patched on disk but never become active. The server looks well maintained and runs on a kernel from half a year ago — the most unpleasant variant, because it feigns security.
nano /etc/apt/apt.conf.d/52-unattended-upgrades-localUnattended-Upgrade::Automatic-Reboot "true";
Unattended-Upgrade::Automatic-Reboot-Time "03:30";
Unattended-Upgrade::Automatic-Reboot-WithUsers "false";
Unattended-Upgrade::Remove-Unused-Kernel-Packages "true";
Unattended-Upgrade::Remove-Unused-Dependencies "true";Check whether the settings take effect:
apt-config dump | grep -i 'Automatic-Reboot'
unattended-upgrade --dry-run
This Decision Has to Be Made
An automatic reboot at half past three in the morning terminates every running session of the application. With Vaadin this is more noticeable than with many other frameworks, because the UI state is held on the server — Part 1 covers this in detail.
Anyone who enables the reboot accepts a nightly maintenance window. Anyone who leaves it out accepts unpatched kernels. Both are defensible. Remaining undecided is not, because then the default applies — and it reads: patch, but do not reboot.
Creating an Administrative User
So far there is exactly one user on the system, and it may do everything. That is about to change: administrative work will from now on run through a dedicated account that obtains privileges when needed instead of holding them permanently.
The practical gain is less philosophical than it sounds. An administrative
account without permanent privileges makes typos harmless that, as root,
would damage the system. And it is the precondition for completely disabling
root access via SSH in the next chapter.
Creating the User
adduser --disabled-password --gecos "First Last" sven
passwd sven
usermod -aG sudo sven
--disabled-password initially creates the account without a password;
passwd then sets one deliberately. The detour seems cumbersome, but it
avoids the interactive dialog of adduser and can therefore also be used in a
script.
The password is not needed for logging in — that runs via a key. It is needed
for sudo.
The sudo Group
On Debian, membership in the group sudo is sufficient. A dedicated rule in
/etc/sudoers is not necessary and would be an additional source of errors.
getent group sudosudo:x:27:svenAnyone who wants to set up sudo without a password prompt should consider
the decision carefully: it turns every compromised user account immediately
into full access. On a server that runs a publicly reachable application, the
password prompt is the right default.
Depositing the SSH Key
From the workstation, not on the server:
ssh-copy-id -i ~/.ssh/id_ed25519.pub sven@198.51.100.10ssh-copy-id creates the directory with the correct permissions and appends
the key. It can be done by hand as well, just with more opportunities for
mistakes:
install -d -m 700 -o sven -g sven /home/sven/.ssh
nano /home/sven/.ssh/authorized_keys
chmod 600 /home/sven/.ssh/authorized_keys
chown sven:sven /home/sven/.ssh/authorized_keys
The permissions are not optional. sshd refuses service if authorized_keys
is readable by others — a frequent reason for a key login that fails for no
apparent reason.
To check which keys are actually deposited:
ssh-keygen -lf /home/sven/.ssh/authorized_keysVerifying Access Before Hardening
This is the most important step of this chapter, and it is regularly skipped.
In the next chapter, root access is disabled. Anyone who discovers at that point that the new user does not work has locked themselves out and needs the provider’s emergency console.
So beforehand, in a second session — the existing one stays open:
ssh -i ~/.ssh/id_ed25519 sven@198.51.100.10 'id'
ssh -i ~/.ssh/id_ed25519 sven@198.51.100.10 'sudo whoami'
The first command must print the user identity, the second root. Only when
both are correct does it go on.
The open session as root is not a blemish but the safety rope: as long as it
exists, any faulty change to the SSH configuration can be rolled back, even if
no new login succeeds anymore.
Hardening SSH
SSH is the only service on this server that is reachable from outside, and it
currently accepts passwords for root. Both change now.
Where Debian Reads the Configuration
Debian 13 splits the SSH configuration into a main file and a directory of drop-in files. A look at both is worthwhile before changing anything:
grep -n -i '^include' /etc/ssh/sshd_config
grep -nvE '^\s*(#|$)' /etc/ssh/sshd_config | grep -i permitroot
ls -1 /etc/ssh/sshd_config.d/12:Include /etc/ssh/sshd_config.d/*.conf
33:PermitRootLogin yes
50-cloud-init.confAnd in this drop-in file it says:
PasswordAuthentication yesThe Pitfall That Trips Up Most People
From these three observations follows something that contradicts intuition:
sshd uses the first value found per parameter, not the last.
Two consequences follow from this, and both lead to a change remaining without effect, with no error message appearing.
First: The Include line is on line 12, the PermitRootLogin yes on
line 33. Everything from the drop-in directory is therefore read before
the main file and wins. Anyone who changes PermitRootLogin in
/etc/ssh/sshd_config changes a value that would never take effect anyway, as
soon as a drop-in file sets the same parameter.
Second: The files in the drop-in directory are read in alphabetical
order. cloud-init places 50-cloud-init.conf there and sets
PasswordAuthentication yes. A file of your own only takes effect if its name
sorts before it. Hence 10-hardening.conf — and not, as intuition
suggests, 99-hardening.conf.
Anyone who creates a 99- file ends up with a file whose content is correct
and which accomplishes nothing. The directory looks right; the configuration
is not.
The Hardening
sudo nano /etc/ssh/sshd_config.d/10-hardening.conf# sshd uses the FIRST value it finds per parameter.
# This file must sort lexically BEFORE 50-cloud-init.conf,
# which sets PasswordAuthentication back to "yes".
# Authentication
PermitRootLogin no
PasswordAuthentication no
KbdInteractiveAuthentication no
PubkeyAuthentication yes
# Only explicitly named accounts may log in
AllowUsers sven
MaxAuthTries 3
LoginGraceTime 30
MaxSessions 4
# Forwarding is not needed on an application server
X11Forwarding no
AllowAgentForwarding no
AllowTcpForwarding no
PermitTunnel no
GatewayPorts no
# Reduce host keys to ed25519
HostKey /etc/ssh/ssh_host_ed25519_keyThree entries deserve a justification.
AllowUsers is the most effective of them. Without this line, every
account that at some point receives a key may log in — including a service
account where nobody intended that. With it, the list of permitted accounts is
explicit and readable.
AllowTcpForwarding no prevents the server from serving as a jump host.
Without this setting, anyone who is allowed to log in can tunnel arbitrary
connections through the server — including into networks that are not
reachable from outside.
HostKey reduces the offered server keys to one. As soon as the parameter
is set, the defaults no longer apply. The result is a single fingerprint
instead of three — which is what makes the comparison from Chapter 3
unambiguous in the first place.
Checking Before Reloading
Two commands, and the second is the decisive one:
sudo sshd -t
sudo sshd -T | grep -E '^(permitrootlogin|passwordauthentication|allowusers)'
sshd -t checks only the syntax and stays silent on success. sshd -T shows
the effective configuration after resolving all drop-in files:
permitrootlogin no
passwordauthentication no
allowusers sven
That is the only reliable answer. Reading the configuration file does not
answer the question — that is exactly where the pitfall from above goes
unnoticed. Anyone who uses sshd -T habitually cannot miss the ordering
problem.
sudo systemctl reload sshreload instead of restart: existing sessions are preserved. If the
configuration renders access unusable, the open session from Chapter 5 is
still there and the change can be rolled back.
Proof From Outside
Claiming is not enough. Three cases, all from the workstation:
# 1) The admin user by key - must succeed
ssh -i ~/.ssh/id_ed25519 sven@198.51.100.10 'echo OK'

# 2) root - must be rejected
ssh root@198.51.100.10
#    root@198.51.100.10: Permission denied (publickey).

# 3) Password login - must be rejected
ssh -o PubkeyAuthentication=no -o PreferredAuthentications=password sven@198.51.100.10
#    sven@198.51.100.10: Permission denied (publickey).
The proof is in the third case, specifically in the wording of the error
message. It says publickey — although a password login was explicitly
requested. So the server no longer offers passwords at all. If it still had
them on offer, it would say password.
For comparison, it is worth looking back at Chapter 3: there the answer was
still Permission denied (publickey,password).
What Is Offered Afterwards
ssh-keyscan 198.51.100.10 > /tmp/hk.txt && ssh-keygen -lf /tmp/hk.txtInstead of three lines, one now appears. The fingerprint that a new machine must confirm on the first connection is thus uniquely determined.
Configuring the Firewall
How Fast the First Attacks Arrive
Before it comes to rules, a look into the log is worthwhile — because it answers the question of whether the effort is worth it with numbers instead of assumptions.
The reference server was rebooted after the kernel update from Chapter 4 at 08:01:25. The first foreign login attempt appears in the journal at 08:01:48:
2026-09-04T08:01:48+00:00 sshd-session[1018]:
  Failed password for root from 31.58.216.82 port 50496
Twenty-three seconds. At that point no service was published, no domain pointed to the address, and nobody had mentioned it anywhere. A public IPv4 address is enough: the entire address space is being swept permanently.
How permanently is shown by the evaluation over different time spans:
journalctl -u ssh | grep -cE 'Failed password|Invalid user'| Time span | Failed attempts | Distinct addresses |
|---|---|---|
| last hour | 219 | 12 |
| since the reboot (2.5 hours) | 608 | 23 |
| over roughly eleven weeks | 1,121,423 | — |
Over a million login attempts on a server that does nothing and that nobody knows. That is roughly 150 per hour, without interruption, day and night.
It is revealing which account names are being tried:
19739  admin        6311  test
15062  ubuntu       5558  debian
10225  user         5429  deploy
7153 solana 4960 soladmin, ubuntu, user, debian, deploy — the usual suspects. But
solana in fourth place and sol in eighth: there is a targeted search for
crypto wallet nodes. The attempts are not blind; they are profit-oriented.
That is the reason why root access and password login were disabled in Chapter 6 — not as a formality, but because 150 attempts per hour run against them. With password login enabled, it is a question of time and password quality.
Defining the Rules
Debian does not ship ufw:
sudo apt-get install ufwAllow first, then enable. In the reverse order, ufw enable cuts off
your own SSH session, and the server is only reachable via the provider’s
emergency console. That is the classic way to lock yourself out.
sudo ufw default deny incoming
sudo ufw default allow outgoing
sudo ufw allow 22/tcp  comment 'SSH'
sudo ufw allow 80/tcp  comment 'HTTP'
sudo ufw allow 443/tcp comment 'HTTPS'
sudo ufw enable
Three ports, nothing more. The application port deliberately stays closed. In Part 1, a servlet container listens on port 8080 — but exclusively on the loopback address, reachable only through the reverse proxy. Blocking it in the firewall as well is the second line of defense; the first is not listening to the outside there in the first place.
Port 80 is needed even though the application is later supposed to be reachable exclusively via HTTPS: the automatic certificate issuance in Part 1 runs through a challenge on port 80.
Proof From Outside
From the workstation, not from the server:
for p in 22 80 443 8080; do
  nc -z -w 4 198.51.100.10 $p && echo "$p open" || echo "$p filtered"
done22 open
80 filtered
443 filtered
8080 filtered80 and 443 are allowed in ufw, but nothing is listening on them yet — they
only become reachable with the reverse proxy in Part 1. That is the expected
intermediate state and not an error.
Slowing Down Repeated Attempts
Given the numbers above, a plain port allowance is too little. Two measures complement each other.
Rate limiting directly in ufw:
sudo ufw delete allow 22/tcp
sudo ufw limit 22/tcp comment 'SSH (rate-limited)'
limit instead of allow drops connections when more than six arrive from
the same source within 30 seconds.
fail2ban evaluates the logs and locks out conspicuous addresses for a
while:
sudo apt-get install fail2ban
sudo nano /etc/fail2ban/jail.local[DEFAULT]
# Debian 13 logs to journald, not to /var/log/auth.log
backend = systemd
# Apply bans through ufw so that only ONE rule set exists
banaction = ufw
ignoreip = 127.0.0.1/8 ::1
bantime = 1h
findtime = 10m
maxretry = 5
[sshd]
enabled = trueBoth lines in the header are Debian-13-specific and easily overlooked. Without
backend = systemd, fail2ban looks for a file that no longer exists.
Without banaction = ufw, it builds a second, competing ruleset next to ufw
— both then work, but nobody can see as a whole anymore what is blocked.
sudo systemctl enable --now fail2ban
sudo fail2ban-client status sshd
The effect is immediately visible:
Status for the jail: sshd
`- Actions
   |- Currently banned: 2
   `- Banned IP list:   104.248.160.169  173.244.60.241
fail2ban evaluates the existing journal at startup and immediately bans what
was already conspicuous there. You do not have to wait to see an effect.
What This Achieves and What It Does Not
With key-only login, the sshd jail protects little — anyone without a
matching key does not get through anyway, no matter how often they try. The
gain lies elsewhere: less system load, a readable log, and a safety net for
the case that someone later re-enables password login by accident.
As the only measure, fail2ban would be weak. As a complement to Chapter 6,
it is right.
The Rate Limit Also Hits Your Own Tools
Directly after ufw limit 22/tcp, your own connection can drop:
ssh: connect to host 198.51.100.10 port 22: Connection refusedThat is neither an attack nor an outage. A sequence of ssh, scp, and
ssh-keyscan opens more than six connections within a few seconds and
thereby exceeds your own threshold. After the time window expires, access is
there unchanged.
Anyone who runs scripts that open many short SSH connections should plan for
this: ControlMaster and ControlPersist in the SSH configuration keep one
connection open and reuse it, instead of establishing a new one for every
command.
Outbound Connections
So far, everything outbound is open. Restricting this limits what a compromised process can download and where it can exfiltrate data to:
sudo ufw default deny outgoing
sudo ufw allow out 53      comment 'DNS'
sudo ufw allow out 80/tcp  comment 'HTTP: apt, Zertifikate'
sudo ufw allow out 443/tcp comment 'HTTPS: apt, Zertifikate'
sudo ufw allow out 123/udp comment 'NTP'
sudo ufw reload
Do not forget NTP. Without a synchronized clock, the verification of TLS certificates fails, and the automatic certificate renewal in Part 1 breaks. That is the error that only shows up weeks later.
Afterwards, check that what must work still works:
sudo apt-get update
timedatectl show -p NTPSynchronized --value
An Honest Assessment
The effect of this restriction has limits. Port 443 must remain open, and via 443 practically every destination on the Internet is reachable. Anyone who wants to exfiltrate data chooses HTTPS for it, not an exotic port.
The gain lies with everything that does not follow this rule: a connection to some remote endpoint on port 4444, mail delivery over port 25, a tunnel on an arbitrary high port. That is real, but it is not a barrier — and it should not be described as one.
Hardening Kernel Parameters
The previous chapters secured the system towards the outside. This chapter turns the view inward: what may a process on this server find out about other processes and about the kernel?
Debian already sets most security-relevant kernel parameters sensibly. Two, however, are set to the least secure value.
The Parameter That Matters
sysctl -n kernel.yama.ptrace_scope0ptrace is the mechanism a debugger uses to read the memory of another
process. At 0, this access is allowed for every process on every other
process of the same user.
The impact shows in the interplay with a topic from Part 1. There, the point is to keep credentials out of command-line arguments, because those are visible to every user of the system in the process list. The effort is justified — but it evaporates as long as another process may simply read the same value from memory.
kernel.yama.ptrace_scope = 1With 1, a process may only inspect its own child processes. A debugger still
works if it starts the target program itself; attaching to a foreign process
afterwards requires root privileges.
This is a pattern that recurs throughout this series: individual measures
only work in combination. A carefully secured handover of credentials and
open ptrace access cancel each other out.
The Remaining Values
sudo nano /etc/sysctl.d/60-hardening.conf# Make the memory of other processes unreadable
kernel.yama.ptrace_scope = 1
# Do not expose kernel pointers in /proc
kernel.kptr_restrict = 2
kernel.dmesg_restrict = 1
net.core.bpf_jit_harden = 2
# Network
net.ipv4.tcp_syncookies = 1
net.ipv4.conf.all.accept_redirects = 0
net.ipv4.conf.default.accept_redirects = 0
net.ipv4.conf.all.send_redirects = 0
net.ipv4.conf.all.accept_source_route = 0
net.ipv4.conf.all.rp_filter = 1
net.ipv4.conf.all.log_martians = 1
net.ipv6.conf.all.accept_redirects = 0
net.ipv6.conf.all.accept_source_route = 0
# File system
fs.protected_hardlinks = 1
fs.protected_symlinks = 1
fs.protected_fifos = 2
fs.protected_regular = 2
fs.suid_dumpable = 0sudo sysctl --systemkernel.kptr_restrict hides kernel memory addresses in /proc. They are
needed for developing attacks, but by nothing in normal operation.
The network parameters reject redirects and source-routed packets — techniques from an era when trust on the network was the default. The file system parameters prevent a class of attacks in which an unprivileged user plants a link in a shared directory.
Verification
for k in kernel.yama.ptrace_scope kernel.kptr_restrict net.core.bpf_jit_harden; do
  printf '%-32s %s\n' "$k" "$(sysctl -n $k)"
done
The values now read 1, 2, and 2. Because the file lives under
/etc/sysctl.d/, they also apply after a reboot.
User and Permission Concept
On this server, three kinds of accounts are distinguished from now on. The administrative account from Chapter 5 is one of them; this chapter adds the second and explains why the third must not exist.
| Account | Purpose | Login |
|---|---|---|
root | system administration via sudo | none, neither via SSH nor by password |
| administrative account | administration by humans | key, sudo with password |
| service account | runs the application | none |
What does not exist: an account that is both. Running an application under the
administrative account saves one step and costs the entire separation — the
application process would then have access to the SSH keys and, via sudo, to
the whole system.
The Service Account
The later application is called vaadinapp, and its account is called the
same:
sudo adduser --system --group \
     --home /var/lib/vaadinapp \
     --shell /usr/sbin/nologin \
vaadinappid vaadinappuid=101(vaadinapp) gid=103(vaadinapp) groups=103(vaadinapp)Three details are worth explaining.
--system assigns an ID below 1000. That is not a technical necessity,
but a lived convention: tools that list “real” users hide this range. The
command from Chapter 3 that searches for users with an ID of 1000 or above
therefore does not find the service account — and that is intended.
--shell /usr/sbin/nologin prevents any interactive session. Even if
someone were to set a password or deposit a key, no login would come about.
--home /var/lib/vaadinapp places the home directory where the
application’s mutable data lives. Chapter 10 covers the layout as a whole.
One Account per Application
The obvious shortcut would be a shared account for all Java applications —
jetty, say. It saves administrative effort and cancels exactly the property
this is all about.
Two applications under the same account can read each other’s files, inspect
each other’s credentials, and — with a ptrace_scope of 0, see Chapter 8 —
read each other’s memory. Whoever compromises one of them has both.
One account per application costs one command. This calculation always works out.
The Service Must Not Be Able to Change Its Own Program
The most important principle of this chapter is at the same time the most rarely implemented one: the service account does not own its own program files.
Whoever compromises an application can do what the application may do — but they cannot replace the program on disk. A restart brings back the unmodified state. Without this separation, a manipulation survives every restart, and the cause is later almost impossible to find.
In practical terms: the program directory and the configuration belong to
root; the service account may read. Writable is exclusively the area for
mutable data. Chapter 10 implements this.
A Note on DynamicUser
systemd can create service accounts itself at every start and discard them
afterwards. That saves creating them by hand and leaves no stale accounts
behind.
For this series it is not used. The reason is the section above: permanent ownership requires a permanent ID. With a changing ID, it cannot be determined which files belong to the service and which do not — and that is exactly what the protection rests on.
For stateless services without files of their own, DynamicUser is a good
choice. An application with a data set is not such a service.
Directory Structure for Applications
An application consists of three kinds of files that have nothing to do with one another: the program, its configuration, and the data that accumulates during operation. They differ in who may change them, how often they change, and whether they belong in a backup.
A directory in which everything lies side by side is convenient and makes each of these questions unanswerable.
The Layout
The Filesystem Hierarchy Standard has answered the question for decades. For
an application named vaadinapp:
| Path | Contents | Owner | Service may |
|---|---|---|---|
/opt/vaadinapp | program, artifact | root:vaadinapp | read |
/etc/vaadinapp | configuration | root:vaadinapp | read |
/var/lib/vaadinapp | mutable data | vaadinapp:vaadinapp | write |
| journald | logs | — | write |
sudo install -d -m 750 -o root      -g vaadinapp /opt/vaadinapp
sudo install -d -m 750 -o root      -g vaadinapp /etc/vaadinapp
sudo install -d -m 750 -o vaadinapp -g vaadinapp /var/lib/vaadinapp
install -d instead of mkdir sets permissions and owner in one call. With
mkdir, two more commands follow, and the second is easily forgotten.
The permissions 750 mean: the owner may do everything, the group may read
and enter, everyone else may do nothing. Since the service account is in the
group of the same name, it can read — and write only where it is itself the
owner.
Logs
/var/log/vaadinapp is deliberately absent from the table. Services running
under systemd write their output to journald; a separate log directory
creates a second store with its own rotation and its own cleanup needs.
Applications that additionally keep an access log of their own — in Part 1
that will be the case — place it below /var/lib/vaadinapp. Writing happens
there anyway, and it stays at one writable area instead of two.
Why This Separation Is More Than Tidiness
Here is the point at which this chapter goes beyond housekeeping.
In Part 1, the application service is set up so that systemd presents it the
entire file system read-only. Released is only what is explicitly named. With
clean separation, that is a single line: the area for mutable data.
If everything lay under one shared directory, exactly this directory would have to be released — and with it the program and the configuration. The measure would formally exist and would be practically ineffective.
These five minutes in Chapter 10 are the precondition for a security measure in Part 1 to take hold at all. Anyone who treats the structure as a matter of taste discovers later that the hardening does not work, and does not find the reason.
A Subtlety That Surprises
It is not enough to make the program directory belong to root. What also
matters is who owns the parent directory.
Whoever may write to a directory may rename the entries it contains —
regardless of who owns them. A service with write access to its home directory
can therefore push aside a root-owned subdirectory inside it and put its own
in its place. It never touched the files inside; yet it achieved exactly what
was supposed to be prevented.
That is why the parent directory also belongs to root, and writable are only
the subdirectories in which writing actually happens:
sudo install -d -m 750 -o root      -g vaadinapp /var/lib/vaadinapp
sudo install -d -m 750 -o vaadinapp -g vaadinapp /var/lib/vaadinapp/data
sudo install -d -m 750 -o vaadinapp -g vaadinapp /var/lib/vaadinapp/work
Verification
The test for it is simple — it checks what the service account is actually allowed to do:
for d in /opt/vaadinapp /etc/vaadinapp /var/lib/vaadinapp /var/lib/vaadinapp/data; do
  sudo -u vaadinapp test -w "$d" && s="schreibbar" || s="read-only"
  printf '%-32s %-11s %s\n' "$d" "$s" "$(stat -c '%U:%G %a' $d)"
done/opt/vaadinapp read-only root:vaadinapp 750
/etc/vaadinapp read-only root:vaadinapp 750
/var/lib/vaadinapp read-only root:vaadinapp 750
/var/lib/vaadinapp/data schreibbar vaadinapp:vaadinapp 750Exactly one writable path. That is the goal.
Initial State for Part 1
The server is prepared. This chapter records what has been achieved — as a list that can be checked off, and as a set of commands that prove the state instead of asserting it.
Anyone who skipped this part because their own server is already run in a hardened state can cross-check here and then move on to Part 1.
What Applies Now
| Area | State |
|---|---|
| System packages | current, automatic security updates with nightly reboot |
| Kernel | the installed version is also the one running |
| Login | exclusively by key, exclusively for named accounts |
root | not reachable via SSH |
| Firewall, inbound | 22 (rate-limited), 80, 443 |
| Firewall, outbound | DNS, HTTP, HTTPS, NTP |
| Repeated failed attempts | get banned |
| Kernel parameters | hardened, in particular ptrace_scope |
| Administrative account | present, with sudo |
| Service account | present, with no way to log in |
| Directories | program, configuration, and data separated |
The Proof
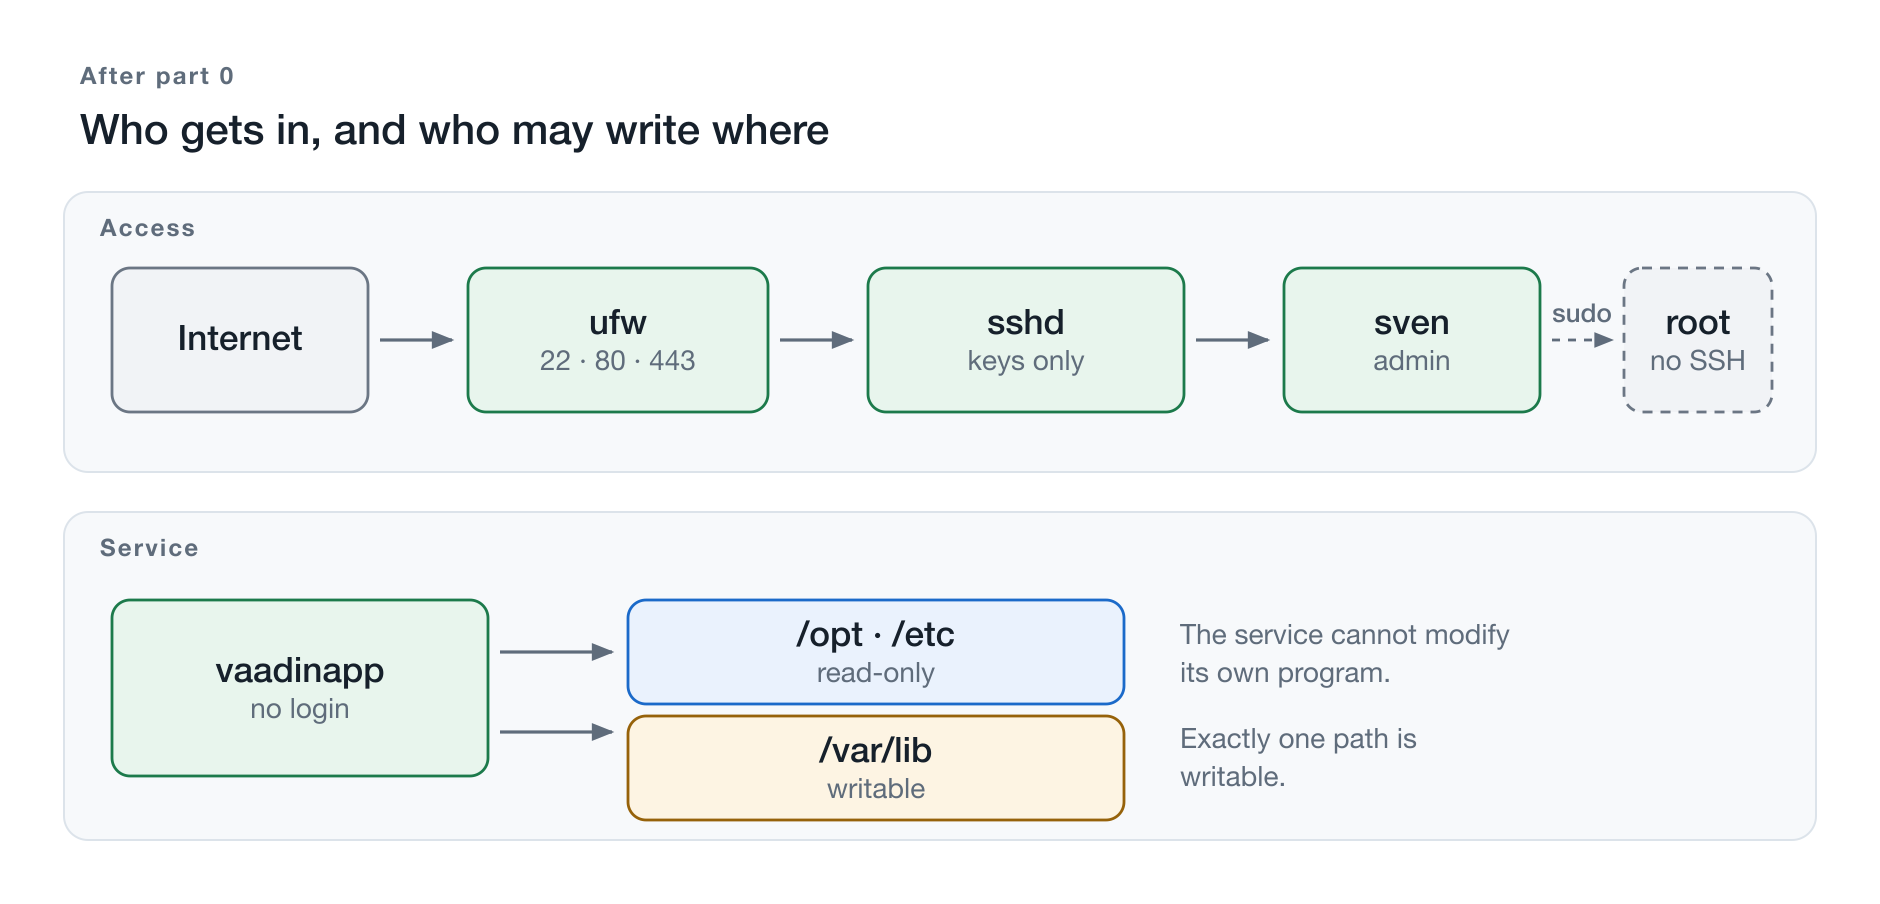
Figure 2: The access path after completing this part.
These commands answer the list above. They run in a few seconds and are worth it, because reading a configuration file is something different from checking the effective state.
# Is the installed kernel the one running?
uname -r
ls -1 /boot/vmlinuz-* | sort -V | tail -1

# Effective SSH configuration
sudo sshd -T | grep -E '^(permitrootlogin|passwordauthentication|allowusers)'

# Firewall
sudo ufw status verbose

# Ban mechanism
sudo fail2ban-client status sshd

# Kernel parameters
sysctl -n kernel.yama.ptrace_scope kernel.kptr_restrict

# Accounts
getent passwd vaadinapp
getent group sudo

# What is listening to the outside?
ss -tlnp
The last command should still show only sshd. No application is running on
this server yet — that changes with Part 1.
And from another machine, because only that is real proof:
ssh root@198.51.100.10
#  Permission denied (publickey).

for p in 22 80 443 8080; do
  nc -z -w 4 198.51.100.10 $p && echo "$p open" || echo "$p filtered"
done
#  22 open, everything else filtered
What Part 1 Finds in Place
Part 1 builds on exactly this state and does not repeat it. It installs a Java
runtime and a servlet container, gets a Vaadin application running on it as a
web archive, places it as a systemd service under the prepared service
account, and makes it publicly reachable through a reverse proxy with an
automatically issued certificate.
Two things from this part will resurface there. The directory separation from Chapter 10 becomes the basis for effectively confining the application service. And the numbers from Chapter 7 get a sequel: as soon as the application receives a certificate, it becomes publicly known — faster than you would think possible.


